Happy Holidays everyone! I'm happy to report that I've finished making my 60+ Christmas cards for this year! I normally do around 120, but after doing this for almost 15 years, I've cut down considerably on the handmade cards. I only send them to my family and art friends, plus the people who've expressed their gratitude for my work. The rest get store bought cards. Hey, it's the thought that counts.
So, this year, I decided to create a tutorial of the immense work that goes into the endeavor every year. I'm actually considering including a note in each card directing the recipients to this blog post.
These cards took me almost 3 full days to complete, and without certain tools, it would've taken me much longer. I have to give special mention to two special, time-saving tools:
My Misti tool. Even though I used wood mounted stamps, I decided to un-mount them so I could use the Misti. It's very easy to do ... just put your stamp in the microwave for 10-15 seconds (depending on the size), and then gently peel it off. The heating process is enough to soften the adhesive for removal.
My Stampin' Up! scoreboard (this link directs you to the website of Tina Rosenkrans, my friend & demonstrator). I also own the Martha Steward scoreboard, but this one beats it hands down.
It has storage capacity for both the stylus tool, and little pointer pegs so you can easily mark exactly where you want to score, so you can quickly score your cardstock for those mass production jobs like Christmas cards, invitations, thank you cards, etc.
I placed a peg at 4-1/4" so I could quickly score all my base cardstock quickly & efficiently. You could also purchase accessory plates with diagonal or wavy lines.
I began by taking Tim Holtz Distress Watercolor paper and cutting it down to 4"
by 5-1/4". This will be the top layer of my card.
I wanted a nice, soft, peaceful feel for my design, so I chose to use Tim Holtz Distress Inks in Salty Ocean and Tumbled Glass.
I used the plastic stamp case as a palette, and smushed the mini ink pad several times to give myself a source of color.
I also used my Tim Holtz wide water brush, and his Distress Sprayer.
I sprayed the paper with water and spread out with the brush. I then began with the Salty Ocean and started spreading the color from the bottom up. I switched to Tumbled Glass and spread it towards the top where it ended up barely visible.
I laid all the cards out and let them dry completely.
I decided I wanted a little more, so I took the Evergreen Bough Distress Ink refill and put some on top of the now clean stamp case. I sprayed with water to dilute it. I dipped in my fan brush and tapped the brush on my hand over the cards to create a splatter.
You'd think I would've cleaned off my table before a big job like this, but I'm the kind of person who hits & runs when I feel inspired.
While those were drying, I started cutting up my card bases. I used Neenah Solar Crest 110 lb. cardstock. It's an investment, but well worth it. You get 250 sheets, and it comes out to around $.21 per sheet. It's heavier than regular cardstock, and it's fabulous for a card base.
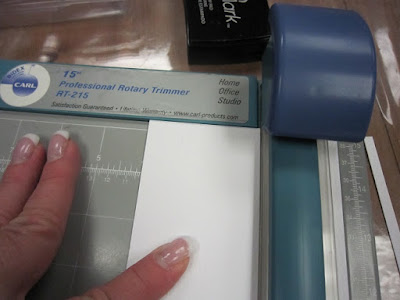
I cut each 8-1/2" x 11" sheet in two (8-1/2" x 5-1/4"), and using my Carl cutter, I was able to cut 2 sheets per time. I could've cut 3, but I didn't want to take a chance on slippage.
Next, I scored each card base at 4-1/4".
And with my scoreboard, I was done in about a minute!
I wanted the watercolor paper to be raised off the card base, so instead of using a million (litterally) little foam adhesive dimensionals, I used plain white craft foam.
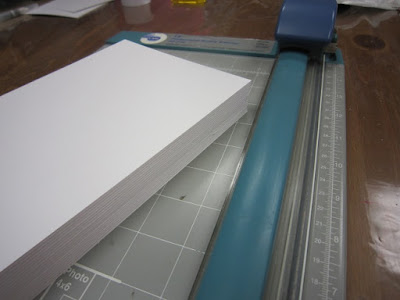
The sheets are 12" x 18", and my Carl cutter cut through them easily.
I was able to get nine 3-3/4" x 5" pieces from each sheet. I cut them a 1/4" smaller than my watercolor paper so they wouldn't be visible underneath.
I added Tombow Multi Liquid Adhesive on the foam.
Then adhered it to each card base.
All done! Now, on to the stamping!
For the card fronts, I used Stampin' Up!s retired Solemn Stillness set. I chose the tree with the stars.
For my sentiment, I used Stampin' Up!s retired Greetings of the Season and chose the Peace on Earth. I removed the rubber from the wood (as noted above) and placed the stamps on my Misti tool.
I laid my stamps where I wanted them positioned on my card upside down (not shown). I closed the door of the Misti and the stamps adhered to the cover. I opened the cover to check alignment.
After placing a my cardstock in the tool, I inked the images with Versamark ink and closed the door and pressed.
Perfect alignment and stamping every time! I added Ranger Silver Detail embossing powder and set aside. I repeated this for about 10-15 cards, and then heat set all the cards. Repeated until I was done with all the cards.
I repeated the process with my signature stamp for the back of each card base.
I had planned on doing heat embossing on the inside message, so I felt I needed to emboss my signature image as well.
After stamping, and adding embossing powder ...
I lined up all the cards and heated one to another until all were done.
Finally, for the inside, I used Stampin' Up!s retired set Many Merry Messages.
I also used the Merry Christmas from this retired Stampin' Up! set Season's Greetings. I used Ranger's Jet Black Archival Ink and my Misti tool.
I guess I was anxious to just finish at this point, because I forgot to take pics on the inside process.
For the final step, I added some white sequins from Pretty Pink Posh with my Stick It tool, and Ranger's Glossy Accents.
And this, my friends, is what 60+ handmade Christmas cards looks like.
I'm also going to enter this card into two challenges:
GIVEAWAY WINNER!
Thanks to everyone who visited my blog, decided to follow me, and took the time to leave a comment. The winner of the Tim Holtz Stamptember Simon Says Stamp set & autographed apron is:
LOVE The Tim Man! Fabulous tags! I am a lover of the blueprint stamps! :D Love your creativity!
Congratulations! Debbie, please send me your mailing address, and I'll get this right out to you.


Job well done, Stephanie! Your design is lovely! Thanks for sharing it with us in our "Let it Snow" challenge at the Simon Says Stamp Wednesday challenge!
ReplyDeleteThese are such an endeavor and so awesome sauce to see all of them done. Wowzers! Some people don't have any idea how much goes into card making, especially this many! Wowzers! I am relatively new to card making so thank you for the wonderful advice about your tools and the cardstock! Congrats to the winner as well!
ReplyDeleteWow, this must have been a real labour of love Stephanie and I'm sure the recipients will really appreciate receiving such a beautiful card.
ReplyDeleteThanks for sharing with us at Happy Little Stampers.
Hugs
Carol x
I love that old SU set! Nice to see it used again. Beautiful card with the silver embossing and the lovely shades of blue. I enjoyed seeing your process for mass producing the same card - very impressive and organized! Thanks for joining us at Happy Little Stampers.
ReplyDelete