Tuesday, January 9, 2018

Stampin' Up! Watercolor Wishes Card Kit


I needed to keep my mind occupied this weekend, so I thought I'd immerse myself in a project, and what a wonderful project it was!  This photo just does not do these cards justice!  There were wood elements, sequins, washi tape and much more!


I bought this Watercolor Wishes card kit from Stampin' Up! at least a year or two ago.  I just checked the website, and I don't see it, but contact your SU demonstrator for help finding it.
 Because the kit makes 20 cards, I thought I'd save it for a day when I could devote the time to complete it.  I have so many unfinished projects, I didn't need another one!


This is the beautiful, very versatile, stamp set that comes with the kit.  It's my new favorite!

Scroll down for better pictures of the cards.


I really, really enjoyed creating these cards!  This kit was right up my alley, and just the project I needed.  Lucky for me, I accidentally purchased two of these sets, so I can play all over again!

Thanks for visiting!


Tuesday, August 22, 2017

Nuvo Embellishment Mousse


This past weekend was my favorite event of the year, Stamp & Scrapbook Expo 2017 in Edison, NJ.  Always so much fun!  Classes, shopping, cropping, meeting up with old friends, making new friends, swapping buttons, more shopping, etc.  lol

I've been so inspired after seeing new products, samples, demos, and taking classes.  One of the things I wanted to play with are my Nuvo Embellishments Mousse(es?).

I only have the Indian Gold, Pure Platinum, and Fresh Copper.  I ordered some of the beautiful colors today, so I printed out the color chart (thanks Vicky Papaioannou for a great YouTube video and the downloadable chart!).  While creating my chart, I realized the color names are not only on the bottom, but they're teeny-tiny!  So, out came my trusty Brother P-Touch Label Maker!


Much better!

I began with some Stampin' Up! Basic Black card stock, and created my background using 3 different daubers.  I went back & forth with each color adding layers and blending.


Next came Tim Holtz's Riveted Metal embossing folder.


I took a deep breath and added some Black Soot Distress Paint all over, covering the entire piece.


I quickly wiped it all off with my Ikea dishtowel.


I really had to use some elbow grease because the paint starting drying.


I thought this needed something mechanical looking, so I dug out my Lots of Bots stamp set from Stampin' Up!  This set is sooo cute!  An oldie but goodie!


I watercolored the image with Distress Inks, and was pretty happy with myself on how it turned out.

Here's the cute inside ...


And the back ...


Thanks for visiting! 

Wednesday, June 14, 2017

Beautiful Flowers


Had a play date with my friend, Mercedes, last night.  We were inspired by the card below from Pinterest, created by Lin from the Sending Hugs blog.  We used the Designer Flowers stamps & dies by Simon Says Stamp.  I have the Wishing & Sending dies by SSS, but we had a little trouble finding words in my collection of stamps that would go with them.  Guess I'm going to have to head over to the SSS website and order their companion stamp set!  (Like I need more stamps!  haha)  The "friend" die is from Simon Says Stamp, and the small word stamps are from the Amazing to Zany set by Stampin' Up!  The background embossing folder is Stampin' Up!'s Perfect Polka Dots, and I used Silver Lining Nuvo Crystal Drops in the center of each flower.


We got a little carried away while making our flowers.  We started out using white embossing powder on a few different types of cardstock:  Stampin' Up! shimmery white, cardstock vellum, cardstock vellum with Blue Sky Archival Ink by Wendy Vecchi on back, and blue tissue paper recycled from a gift bag I received.


We then moved onto watercolor paper using black embossing powder and painting with Stampin' Up! watercolor crayons.  This was inspired by another Pinterest card (a post for another day), but I soon went back to the white embossing powder on the wc paper.  Since there were two of us playing, we had to take turns stamping, melting the powder, and die cutting the flowers, so that took up most of our evening.

I really want to be playing more now instead of writing this post!

Sunday, November 27, 2016

November 2016 Tim Tag


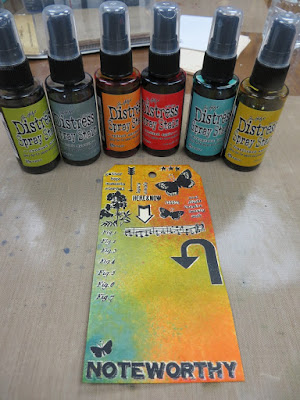
I've been sick pretty much all month with an awful sinus infection and nasty cough, and all the medication has really knocked me for a loop!  Between the antibiotics, steroids, cough syrups and inhaler, I don't know if I'm coming or going.  I've really been jonesin' to get my craftin' on, but I couldn't because all the meds gave me the shakes.  Feeling a little better today, so I gave the Tim tag a whirl.  You can see Tim's original tag here with all the instructions so you can make your own. 


I started out by adding some rub-ons to a manilla tag.


I chose 6 Distress Spray Stains and covered the tag.


After misting with some water, the colors blended nicely.


Next, I distressed the edges around the tag with my distresser tool.


I stamped the Blueprint Leaf onto some Distress Watercolor paper, colored with the Distress Markers and my Detail Water Brush.  I used the mister tool to get some Ground Espresso splatter.


I used tbe coordinating die to cut out my leaf.


I cut the word 'NATURE' into a piece of cork, and saved the letters.  They'll come in handy on another project.


I tore some corrugated a little bigger than my cork word, and added Walnut Distress Ink to both.


I filled in the edges of my leaf with black marker so my leaf would stand out better.


After a couple brads, and some Fossilized Amber Crinkle Ribbon, this deed's done!


Wednesday, November 23, 2016

Chicago: Ministry of Mixology

 
I'm excited to finally get two of my projects on the wall from the Chicago Ministry of Mixology event in October with Andy Skinner and Tracy Weinzapfel.  Love, love, love them! 

 
As many of you know, I'm an ink girl, and paints are a relatively new medium for me.  I've taken classes with Seth Apter, Sue Pellitier, Jodi Ohl, and some Paint Nite events, to name a few.  I love the freedom of adding layers of color! 
 
 
I love the background of this piece, even tho it's not quite the caliber of Seth Apter color layers, but I'm very happy with it.

 
This piece was taught by Tracy.  Who knew I'd be able to paint around those flowers with a paintbrush, and do those fine details?!  Certainly not me!  Thanks Tracy for giving me the little extra attention I needed to boost my confidence!


Friday, October 28, 2016

October 2016 Tim Tag


Happy Halloween people!!  I usually don't do my tags with the holiday themes.  I still do the techniques, but I make the tag my own.  I've had Frankie here for a while now, and he looked so delicious with the embossed foil, I had to try it!  You can see Tim's tag here, with all the instructions to make your own and play along!
 

I had a little baggie of watch or clock parts in my stash, and a couple of pieces made for good bolts on Frankie's neck.


I chose a tan color for his hair, and more of a rust color for his scars.


I chose one of Tim's Halloween words to embellish with.  I cut it out six times!  I layered 5 orange pieces, and offset a base layer of gray.  After distressing with some ink, I covered the whole thing with Glossy Accents.

Thanks for visiting!


Friday, September 30, 2016

September 2016 Tim Tag


Quick post to get my September 2016 Tim Tag posted on Tim's website.  I had made the tag about 2-3 weeks ago, but I've been extraordinarily busy this month, and I'm just under the wire again.

I pretty much did the same as Tim, because I love the colors, and this stamp set seems like it was made just for this technique.  I added my own touch with embellishments.  You can see Tim's tag here, with all the instructions.  Every month when you post your Tim inspired creation to his website, he chooses about 10 winners for prizes!

Here are some detail pics:


Thanks for stopping by!