Sunday, July 31, 2016

July 2106 Tim Tag


It's been an extremely busy summer so far.  Andrea & I went on our Quick Quotes scrapbooking Baltic Sea cruise at the beginning of the summer, my two fabulous great-nephews have been visiting from Arizona, I had a Wendy Vecchi class in Connecticut, family parties, new babies, busy, busy, busy!  And, Rick & I just scheduled a trip to Vegas for August!

Since today is the last day of my birthday month, I guilted Kelly into making the July tag with me.  You can see Tim's original tag here complete with all the instructions to make your own. The poor girl just gets too frustrated with Tim's details!  lol  Kelly's tag is the flower on the left, and mine is the air mail stamp on the right.


My tag


My sewing machine wasn't cooperating with the thickness of the papers, so we had to get creative.  I just wrapped around some Linen Thread by Stampin' Up!


I colored Tim's burlap ribbon with the Evergreen Bough Distress Spray Stain, dried, and frayed the edges.  I also found a cute little Eiffel Tower charm to hang from my Linen Thread.


Kelly did absolutely beautiful coloring on her flower!


She really got frustrated cutting the letters until I introduced her to the Precision Cutting Plate by Sizzix.  Then, she had trouble getting her watercolor cardstock in through the slits with the distressed edges, so I had to baby it through for her.  She used some washi tape for her details.


She adorned the tag with one of Tim's Idea-ology arrows, and liked the simplicity of the tag without adding a ribbon.


Monday, May 30, 2016

Huge Sizzix Giveaway!

Quick post about a giveaway you don't want to miss!  Sizzix has an awesome giveaway going on where 5 winners will receive a Big Shot bundle plus accessories!  Click here for details.

May 2016 Tim Tag


Greetings and happy Memorial Day!  Thanks to all our service men & women for everything!

I created my May tag very early in the month, but I never got around to blogging about it.  I also almost missed the cutoff to post on Tim's blog!  Yikes!  You can see Tim's tutorial on his blog here, where he posts a new tag on the first of every month!  Every month people ... this man's a machine!  An extraordinarily talented machine.  This is Tim's tag:


The technique was to put down some tissue tape, and stamp a focal image.  Then, color the tag, add some embossing tape, more stamping, and flowers.  Tim used his Tiny Tattered Florals die/tool, but instead of using that, I created some flowers using some batting (of all things), and some Distress Spray Stains.  They came out too stinkin' cute!


I added some leaves cut from muslin and inked with Distress Inks.  I couldn't resist adding some small pearls to the centers.


Here's a close up of the flowers.  Adorbs.


I added a little stamping to the top left corner with one of Tim's new background stamps.


This shot shoes the gold embossing paste.  I also added a saying from Tim's Small Talk, and cut it apart.

Only two days until June's tag!  Can't wait!


Friday, April 15, 2016

First Tim Tag of the Year


***Exciting news!***

 Just found out this tag won on Tim's blog! 

 This makes me a 4th time winner! 


My craft table has been piled high with stuff since I hosted my family Christmas party here  Can you guess where I hid all the loose miscellaneous stuff while cleaning up for my guests?  You guessed it!  My husband also had to get to the sump pump down here in my studio, so he cleaned out that part of the room and just piled everything on the floor.  Well, after weeks of cleaning things up, I finally got my table and floor cleaned up (well, you can walk again, lol), so I had another playdate with my friends Grace & Mercedes.  We haven't been able to work on any of Tim's tag this year, so we decided to just start with the current month:  April.  


Here's what Tim's tag looks like, and you can get all his instructions on his blog here.  I'm also going to add this tag for a couple of challenges:
Addicted to CAS:  Inlaid Dies
Simon Says Stamp:  Work It Wednesday
and, of course, Tim's Blog


We did the Paint Resist technique.  I used one of Tim's new Ledger background stamps with Antique Linen Distress Paint for my resist.  Then, I sprayed some Dusty Concord, Shaded Lilac and Twisted Citron Distress Ink Sprays and heated to dry.  I added some stamping using one of Wendy Vecchi's earlier sets, and some of Tim's Rub-Ons.


For my dimensional element, I added one of Tim's Idea-ology arrows, one of his cute little paper clips, and a charm.


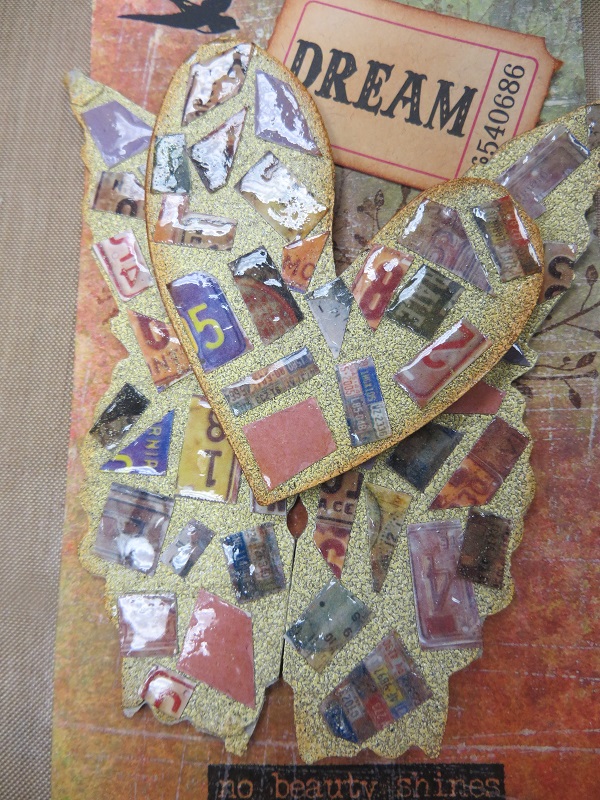
The paper I used for my mosaic flower was from one of Tim's older paper collections.  I used Antique Linen Distress Embossing Powder for my faux grout, and then "painted" all the pieces of paper with Glossy Accents.  I edged the Tattered Flower with Wendy Vecchi's Orange Blossom Archival Ink, and also added some around the edges of the tag.


The leaf stamp was just a solid image, so I added some fine black pen work around the leaves, and then added some dots with a very fine white paint pen.


We were all very creative, and did entirely our own interpretations of Tim's tag.


Mercedes tag:  Using Tim's papers, she cut out bottle caps and a Nebraska license plate to decorate her butterfly.


She couldn't decide on the purple, or the green ruffled ribbon, so she used both!


She added a rub-on, and finished it off with the Giggle tag.


Grace's winged heart came out soft and lovely.


We always have so much fun creating these tags.  We're going to try and get together more often!

Thursday, February 25, 2016

A Wendy Vecchi Technique


I was checking out Wendy Vecchi's blog tonight, and I clicked on the link that brought me to a Melody Lane video of Miss Wendy demonstrating at the winter CHA 2016.  Wendy demo'd the use of Ranger's Archival Inks over Ranger's Weathered White embossing powder.  I encourage you to watch the video.  First off, the Ranger Glacier White pigment ink pad she used to stamp with was awesome on the black mat board!  So crisp & vibrant!  She had me so excited, I just had to play!

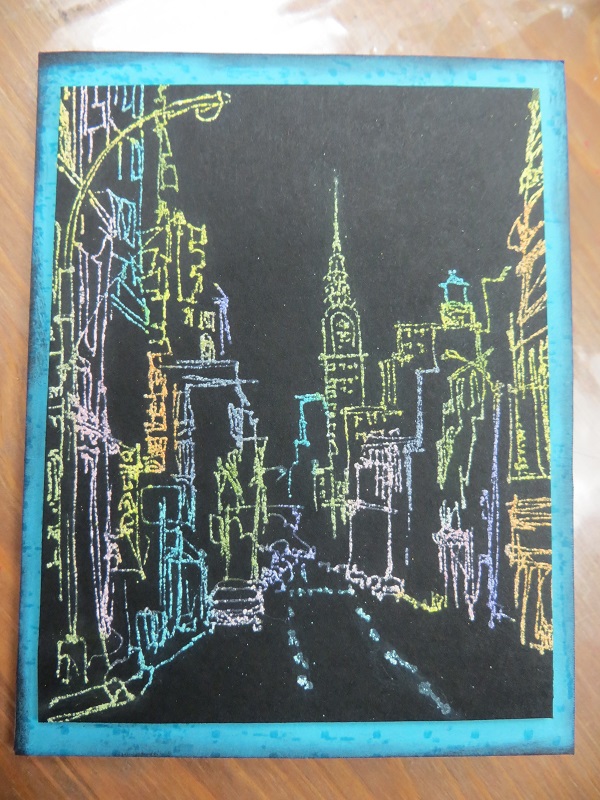
I took some black cardstock, and inked up one of my newest acquisitions, Watercolor NY by Technique Junkie.  I used the Glacier White ink, and then covered with Weathered White embossing powder and melted.  Since I had such tiny places to ink, I used some pointed manicure swabs I got from Harmon.  It's not as easy to pick up ink from the pad with these as it is the ink blending tool.  I could've put drops of reinkers on my craft sheet, but instead of wasting all that ink, I decided to just reink all my Archival pads until they were nice & juicy.

After coloring, I heat set the panel & trimmed.  I wanted the colors to pop, so I used some Tempting Turquoise cardstock from Stampin' Up! as a base.  Kind of plain, so I used Versamark on a background stamp for some texture, and then ran some Black Soot Distress Ink around the edges.

I was just looking as my picture as I was writing this, and I thought I needed some bling ...


Now, what do you think?  I think me likes.  :-)

I'm going to submit this for several challenges:

Happy Little Stampers:  February Mixed Media Challenge  (oops!  posted here, but I just noticed this challenge is PAINT ... my bad!)

Wow!  That's the most challenges I've met with just one card!  Yeah!


Saturday, February 6, 2016

Colored Embossing Paste


Just sitting here, checking my email, and I came across a Laura Bassen video for the Papertrey Ink Blog.  The challenge this week is coloring embossing paste, and I couldn't resist!  I love embossing paste, and I rarely color it, so I had some fun.


I began with some white cardstock, and a 6x6 Stencil Girl stencil I recently acquired.


I used Wendy Vecchi's White Embossing Paste, and colored it with some Ranger Adirondack Re-inkers.  First up, Wild Plum ... beautiful, vibrant color!


I schmeared it on with a palette knife on a few areas.  I had alot left, so I quickly taped down another stencil on more cardstock and repeated.


Stream was next ... gorgeous!


And, finally, Lettuce!


When using embossing paste, you have to work fairly quickly so the paste doesn't dry on your tools.  After applying all my colors of paste, I cleaned off my stencil & knives with warm water.


I've been following the My Sweet Petunia Blog & the Neat & Tangled Blog this week as they've been collaborating using the Misti tool.  I needed to stamp with black ink, as well as Versamark ink, and the Misti tool makes it soooo easy!

I put some tape over the word "HEART" at the bottom of the stamp and applied my Ranger Jet Black Archival Ink.  


I removed the tape, and closed the door, and stamped onto my scrap of Vellum.

After cleaning off the stamp, I repeated the process by taping over the other words, only exposing the word "HEART", and inked that with Versamark.  Added some Ranger Detail Gold embossing powder and heated to melt.

I added some watered down gold paint and black paint splatters, and some gold around my saying.  I also added some Antique Linen Distress Ink around the heart after cutting it out, and also on the edges of my Old Olive Stampin' Up! cardstock base.

Here's a look at the finished card


I colored enough paste to make a 2nd card ... 


I like this one even better!  


I used another 6x6 Stencil Girl stencil


Added the 3 colors


And, voila!


I decided to try this stitched edge on all my edges


And then trimmed evenly around


I used some Ranger Detail Gold embossing powder again for the HELLO on vellum, and then Stampin' Up! White Detail embossing powder on black cardstock for the friend.  I popped up the panel, then popped up the vellum.  I attached with black banner with Tim's Tiny Attacher.  I finished it off with a little spritz from a black marker.

I'm able to enter these cards into several challenges:
A Blog Named Hero:  A Bit of Sparkle
CropStop Challenge:  Anything Goes
Creative Carte Blanche:  Never Done Before


Wish me luck!