Sunday, November 29, 2015

November Tim Tag + Giveaway!


Grace & Mercedes came over for another night of play, and we decided to work on Tim's tag for November.  You can see his original tag here, along with all the instructions and step out photos.  The pumpkin stamp worked very well for this technique, so we all decided to go with it.


I didn't own the background stamp Tim used on his, so Grace & I substituted with Stampin' Up!'s Linen background stamp, and it worked very well with the Distress Paint resist technique.  While working on it, I accidentally ripped my pumpkin.  The arrow from the blueprint stamp is actually pointing to it!  haha!


Another new technique we learned was adhering foil with just a glue stick along the edges of the tag.  Definitely going to do this technique alot more in the future!  Here, you can see I added some rub ons by Tim.
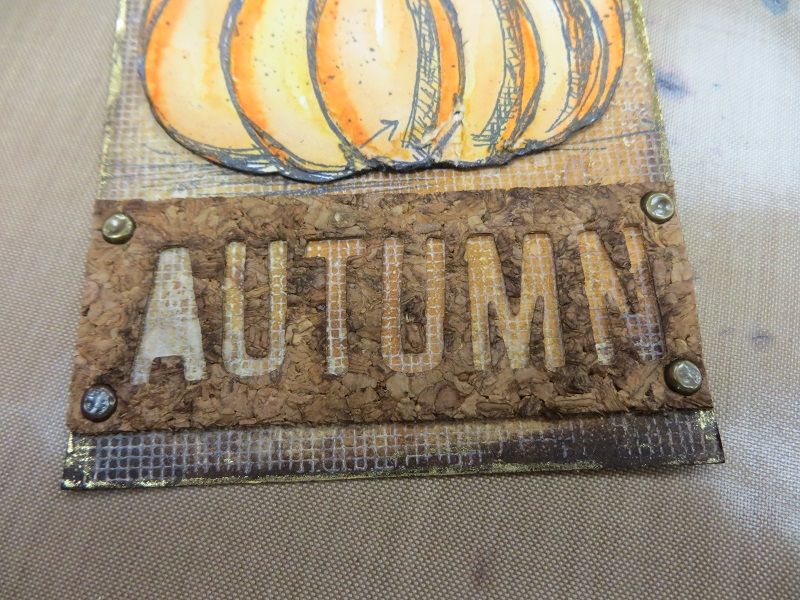

We all loved cutting through the cork and using the negative as an embellishment on our tags.  The cork was very similar in color to my background colors, so I added some Gathered Twigs Distress Ink on the top of my cork, especially around the letters.  I also used Tim's texture hammer to smash the tops of my brads. 


I was out of Idea-ology arrows, so we all got a little creative with embellishing the top half of our tags.  I decided to use a hanger clip with a canvas tag (Close to My Heart).  I just folded it over the hanger.  It was adhesive backed, so it just stuck to itself.  I found a metal embellishment in my stash and added it with another brad.  I used a larger brad to adhere the hanger to my tag.


The girls & I took a selfie after taking pics of our tags.  That's me on the left, Grace in the middle, and Mercedes on the right.


We took this group tag pic before I was done because the girls were leaving.  Graces' tag is on the left.  She wrapped some string around a pen nib.  She also put the Gathered Twigs Distress Ink on her cork, and when she saw what Mercedes did, she also added black Wink of Stella on her tag between her letters.  My *unfinished* tag is in the middle, and Mercedes' tag is on the right.  I showed her how to layer some of Tim's Idea-ology gears with a spinner.  She took it a step further and wrapped some gold cord around the spinner.  She only put the Distress Ink around the edges of her cork and tag, and added the black Wink of Stella to her letter openings.  She also used one of Tim's ledger stamps for her background.  Stunning!

I gotta tell you, Mercedes is very, very new to stamping, and this is only her 3rd Tim tag, and each one, she has knocked out of the park!  She's a natural!

GIVEAWAY!


I promised a giveaway when I got my new blog up & running, so here it is.  I attended both of Tim's classes at the Papercraft Clubhouse in CT, and received an apron for each one.  I asked Tim & Mario to sign one for me to use in a giveaway on my blog, and they were both happy to oblige.  I'm also adding in the Simon Says Stamp exclusive Tim Holtz Stamptember 2015 custom stamp set.

I need to build up my following again, so all you have to do to enter is sign up for my blog, and leave a comment.  You've got until Friday, December 4, 2015 to enter.  Good Luck!


Sunday, November 15, 2015

Wendy Vecchi, Art Anthology, Challenges ... a Tutorial


This is gonna be a long one.  This all began last weekend at the Stamp Scrap Art Tour in Edison, NJ.  This was probably their best show yet here in NJ (in my humble opinion).  We actually had Ted Cutts from Stamper's Anonymous there!  Yay!


I was so excited to finally meet him!  I've always heard from Wendy Vecchi & Tim Holtz how wonderful, funny & generous he is, and they were right!

We went down Friday night for the Make 'n Take Dessert event, and our friend, Grace, came down, as well as "the Kathys" (two sisters we met at the Scrapbook Expo in Somerset, NJ back in September).


Two sweet, fun new stamping/scrapbooking buddies.  Here's Catherine on the left, and Kathyria on the right.

So, many, many dollars later, my bestie, Andrea, and I were on our way out (loaded down with full shopping bags), and we sought out the Kathys to say goodbye.  We found them at the Technique Junkies booth waiting patiently for their turn at the make 'n take table.  I noticed what they were making, and almost fell over!


I took so many pics that day, but I believe this was the sample of the make 'n take with the talented Pat Huntoon herself teaching it!

It took a while, but we finally got our turn, and I was introduced to the wonderful world of Art Anthology Dimensional Paints & Colorations Sprays!

Fast forward to our tutorial today.  I'm entering this is four (yes!  FOUR) challenges:  Make Art with Wendy Vecchi--celebrate fall; Simon Says Stamp Challenge--letter N (nature); Jennifer McGuire--share handmade kindness with someone who works in my community (I'm going to give this to Karla, who's a hairdresser down in town here); and Simon Says Stamp Wednesday Challenge--Thinking of You.

Let's begin ...


I really wanted to play with my new paints, so I decided to make three cards.  I began by stamping the large flower from the Wendy Vecchi True Art set.  I stamped it 3X on each card with Black StazOn ink.


I made 3 masks using Tim Holtz's Mask Sheets.  After stamping on the sheet with Black StazOn, I peeled the mask off the backing sheet and placed them on plain copy paper before cutting.  I did this for 3 reasons:  It's easier to see where I'm cutting with the white paper behind; the paper cuts down the stickiness of the mask so as not to damage my card; and it's easier to store on the backing sheet now.


The mask after cutting out.


The mask on the larger backing sheet.


All 3 of my masks on their backing sheets.

I needed a stamp to fill in the background, so I tried this old Pretty Petals background stamp from Stampin' Up! ... not bad, but it's not exactly what I had in mind.


After going through all the stamps in my vast collection, I found this set.  Sorry, but I don't know what company it's from.  I used the floral wreath with the bee in the center.


Perfect!  Just what I wanted.


I got to work painting.  I used the Art Anthology Dimensional Paints, and started using Vegas Gold, Red Velvet, and Imperial (respectively).


I added some Pumpkin Spice to the Vegas Gold flowers, and then painted all the leaves & stems with Basil.  Only one card ended up with bees, and I painted the bodies with Vegas Gold, and the wings with Gold Digger.


Now, I was ready for the Colorations Sprays!


I started spraying with Siesta Key ...


... and went crazy from there, adding Patience, Glorious, Rustic, and Plush.


On our make 'n take, we used the Stone Effects Dimensional Medium in Lava to stencil a word.  I wanted to use Wendy's Classic Words stencil.  It was a little watery then I remembered, but I did it anyway (just noticed SHAKE WELL on the bottle now while looking for the color name, duh!).  Messed up a little, but I can live with it.


At the time, I thought it was because the stencil was too small, so I used the Art Anthology Soliloquy stencil I bought when I purchased the paints at the Techniques Junkies booth.


This came out much better, and I was happy, but I decided to use my black Wendy Vecchi Embossing Paste on the last card.


It looked a little lost, so I added 3 more words, with a little drying time in between each so as not to smudge.


Cool.  Now, a little Brushed Corduroy Distress Ink around the edges ... 


... and cardstock bases using Stampin' Up! Elegant Eggplant on two, and Early Espresso for one.


I really enjoyed playing with these new paints.  I may just head over to the Techniques Junkies website now to order some more!

Thanks for visiting!


Saturday, October 24, 2015

October Tim Tag


Well, if you read my last post, I got my table all cleaned off, and I was ready for my play date with Grace & Mercedes.  We decided to work on the October tag by Tim Holtz.  This is his version ...


As you can see, we strayed quite a bit from Tim's tag.  lol

You can see Tim's process of creation here, complete with full instructions and step out photos.  I didn't have the zombie die, and I usually don't like to make holiday themed tags anyway.  I've had the Bird Crazy stamp sets, and the bird dies for a while now, and I was excited to finally get to play with them!  What a ball we had!


We decided to create our own backgrounds on watercolor paper instead of using scrapbook paper.  We wanted to have our birds stand out on their own without the distraction of a patterned paper.  Since Grace hasn't been able to play in a while, and Mercedes is new to stamping and creating tags, we went to Richele Christensen's blog for some inspiration.  She has a post for some cards she created for Tim using the Bird Crazy and Accessories stamps, and the dies.  You can see the post here.  You gotta go check them out!

I decided to use this saying from Tim's Small Talk, and I cut it apart and added some bling.


I also added some Stampendous Silver Crushed Glass Glitter behind the little guy.  Couldn't help myself!

I added some Clear Wink of Stella on the ties, along with a little bling on the bowtie (thanks for the idea Mercedes!)


I finally got to use some of this gorgeous ribbon I scored at the last Create event we had here in New Jersey.  So sad they're not doing it anymore.  :-(


Here's Grace & Mercedes with their tags.  Grace went with a birthday theme, and Mercedes did Halloween.


Here's a better look at Grace's tag.  Love the background!


I didn't get a close up pic of Mercedes' tag, so I enlarged the one from above.  She did a fabulous job!  This was only her 2nd Tim Tag!  I think she's a natural at watercoloring!  And, it was her idea to add some bling to the bowtie and her witches hat.  So cute!  Can't wait for our next get together!


Mercedes read this post and was nice enough to take a pic of her tag and send it to me so I could add it to this post.  Her background is awesome, and her birds came out so cute!  You'd never know it was her first time!


Monday, October 19, 2015

Clutter Clean-up Challenge


Is this what your studio looks like?  Are you so overwhelmed you don't know where to start?  It was only 4 short years ago that my sweet hubby created this beautiful studio for me where I swore everything would have it's place, and it would never look cluttered.  Ha!  I mean, I always knew I was a stamp/scrapbooking hoarder, but I think I finally have to admit, I'm out of control and a bit overwhelmed.


These are more pics of my workshop table where I used to (*sigh) teach classes.  I've been telling myself lately that I'm not teaching because I want to give myself a break, but alas, it's probably just because I can't get my table cleared off!


I try putting things into smaller piles so I could put things away more efficiently, but then I get a new package of goodies delivered, or I unpack a bag from a recent crop, expo, or class I've taken, and I'm back at square one!


This is my tall table, where I originally dubbed it my "creation station".  I think once, when my studio was first finished, I was able to create here.  Usually, when I have to clean off my table quickly, things just get dumped onto here.


I just have piles upon piles on this table.  When I have to finish off a birthday card or something, I usually balance a box or binder of stamps on top to find what I'm looking for.


This is the floor along the base of my Stampin' Up! stamp shelves.  I've got boxes lined up there from tools I've bought, and I feel I need to hang onto the boxes "just in case".  Time to get them into the attic.


These alone are two big shopping bags of rubber stamps from my friend who finally cleaned out her stamp room.  I can't decide what to do with them ... hold an event where people can choose a bunch of stamps for a small fee?  ...  sell them on EBay (well, I'd have to learn how!) ... donate them and be done with it?


This is the other end of the room.  Yup, more bags.  These are piles of organization items I don't use anymore, like five(!) Tim Holtz stamp binders.  Baskets, boxes & bags of scrapbooking embellishments.  I've got a sewing machine cabinet buried in there!


This wall is my favorite part of the room.  The shelves to the right of the drawers hold all my Ranger and Tim Holtz stuff ... stamps, inks, paints, pastes, Idea-ology, etc.  All the piles at the base are supplies that need to find homes.  And all those drawers hold punches ... yes!  ALL punches!  I don't need all those punches anymore, do I?


This basket alone must have close to several hundreds of dollars worth of new stamps, dies, embossing folders & stencils, all waiting to get logged in, labelled, and found homes.


And, what about this corner?  I've got Wendy Vecchi's Ranger suitcase (it came home with me from the trip to England with Wendy Vecchi--she emptied it from class supplies, and I filled it with stamps & supplies from a stamp store in London), and a huge rolling bag with supplies from an event that was probably a year ago!

OK, so this pictorial confession is a challenge for myself.  I'm having a friend or two over Wednesday night to have a creative play date.  My goal is to at least get my table cleaned off, and things PUT AWAY, not just piled onto the other table!  I'm going to post before and after pics over the next few weeks of all this clutter disappearing and to keep myself accountable.  Maybe I'll do some giveaways while cleaning stuff out.

If you want to see more classes once again in Mrs. Rodgers' Neighborhood, please, keep me on task!  Now, I'm off to get started!