Sunday, November 29, 2015

November Tim Tag + Giveaway!


Grace & Mercedes came over for another night of play, and we decided to work on Tim's tag for November.  You can see his original tag here, along with all the instructions and step out photos.  The pumpkin stamp worked very well for this technique, so we all decided to go with it.


I didn't own the background stamp Tim used on his, so Grace & I substituted with Stampin' Up!'s Linen background stamp, and it worked very well with the Distress Paint resist technique.  While working on it, I accidentally ripped my pumpkin.  The arrow from the blueprint stamp is actually pointing to it!  haha!


Another new technique we learned was adhering foil with just a glue stick along the edges of the tag.  Definitely going to do this technique alot more in the future!  Here, you can see I added some rub ons by Tim.


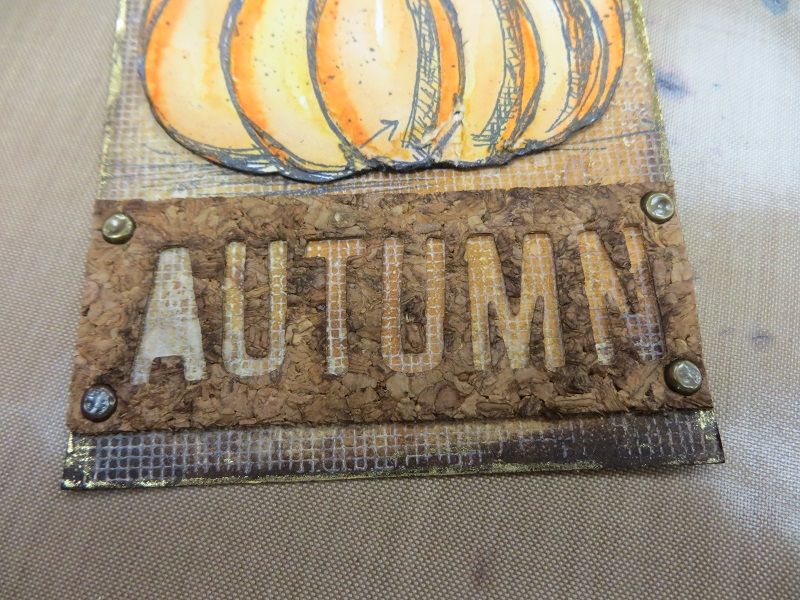
We all loved cutting through the cork and using the negative as an embellishment on our tags.  The cork was very similar in color to my background colors, so I added some Gathered Twigs Distress Ink on the top of my cork, especially around the letters.  I also used Tim's texture hammer to smash the tops of my brads. 


I was out of Idea-ology arrows, so we all got a little creative with embellishing the top half of our tags.  I decided to use a hanger clip with a canvas tag (Close to My Heart).  I just folded it over the hanger.  It was adhesive backed, so it just stuck to itself.  I found a metal embellishment in my stash and added it with another brad.  I used a larger brad to adhere the hanger to my tag.


The girls & I took a selfie after taking pics of our tags.  That's me on the left, Grace in the middle, and Mercedes on the right.


We took this group tag pic before I was done because the girls were leaving.  Graces' tag is on the left.  She wrapped some string around a pen nib.  She also put the Gathered Twigs Distress Ink on her cork, and when she saw what Mercedes did, she also added black Wink of Stella on her tag between her letters.  My *unfinished* tag is in the middle, and Mercedes' tag is on the right.  I showed her how to layer some of Tim's Idea-ology gears with a spinner.  She took it a step further and wrapped some gold cord around the spinner.  She only put the Distress Ink around the edges of her cork and tag, and added the black Wink of Stella to her letter openings.  She also used one of Tim's ledger stamps for her background.  Stunning!

I gotta tell you, Mercedes is very, very new to stamping, and this is only her 3rd Tim tag, and each one, she has knocked out of the park!  She's a natural!

GIVEAWAY!


I promised a giveaway when I got my new blog up & running, so here it is.  I attended both of Tim's classes at the Papercraft Clubhouse in CT, and received an apron for each one.  I asked Tim & Mario to sign one for me to use in a giveaway on my blog, and they were both happy to oblige.  I'm also adding in the Simon Says Stamp exclusive Tim Holtz Stamptember 2015 custom stamp set.

I need to build up my following again, so all you have to do to enter is sign up for my blog, and leave a comment.  You've got until Friday, December 4, 2015 to enter.  Good Luck!


Sunday, November 15, 2015

Wendy Vecchi, Art Anthology, Challenges ... a Tutorial


This is gonna be a long one.  This all began last weekend at the Stamp Scrap Art Tour in Edison, NJ.  This was probably their best show yet here in NJ (in my humble opinion).  We actually had Ted Cutts from Stamper's Anonymous there!  Yay!


I was so excited to finally meet him!  I've always heard from Wendy Vecchi & Tim Holtz how wonderful, funny & generous he is, and they were right!

We went down Friday night for the Make 'n Take Dessert event, and our friend, Grace, came down, as well as "the Kathys" (two sisters we met at the Scrapbook Expo in Somerset, NJ back in September).


Two sweet, fun new stamping/scrapbooking buddies.  Here's Catherine on the left, and Kathyria on the right.

So, many, many dollars later, my bestie, Andrea, and I were on our way out (loaded down with full shopping bags), and we sought out the Kathys to say goodbye.  We found them at the Technique Junkies booth waiting patiently for their turn at the make 'n take table.  I noticed what they were making, and almost fell over!


I took so many pics that day, but I believe this was the sample of the make 'n take with the talented Pat Huntoon herself teaching it!

It took a while, but we finally got our turn, and I was introduced to the wonderful world of Art Anthology Dimensional Paints & Colorations Sprays!

Fast forward to our tutorial today.  I'm entering this is four (yes!  FOUR) challenges:  Make Art with Wendy Vecchi--celebrate fall; Simon Says Stamp Challenge--letter N (nature); Jennifer McGuire--share handmade kindness with someone who works in my community (I'm going to give this to Karla, who's a hairdresser down in town here); and Simon Says Stamp Wednesday Challenge--Thinking of You.

Let's begin ...


I really wanted to play with my new paints, so I decided to make three cards.  I began by stamping the large flower from the Wendy Vecchi True Art set.  I stamped it 3X on each card with Black StazOn ink.


I made 3 masks using Tim Holtz's Mask Sheets.  After stamping on the sheet with Black StazOn, I peeled the mask off the backing sheet and placed them on plain copy paper before cutting.  I did this for 3 reasons:  It's easier to see where I'm cutting with the white paper behind; the paper cuts down the stickiness of the mask so as not to damage my card; and it's easier to store on the backing sheet now.


The mask after cutting out.


The mask on the larger backing sheet.


All 3 of my masks on their backing sheets.

I needed a stamp to fill in the background, so I tried this old Pretty Petals background stamp from Stampin' Up! ... not bad, but it's not exactly what I had in mind.


After going through all the stamps in my vast collection, I found this set.  Sorry, but I don't know what company it's from.  I used the floral wreath with the bee in the center.


Perfect!  Just what I wanted.


I got to work painting.  I used the Art Anthology Dimensional Paints, and started using Vegas Gold, Red Velvet, and Imperial (respectively).


I added some Pumpkin Spice to the Vegas Gold flowers, and then painted all the leaves & stems with Basil.  Only one card ended up with bees, and I painted the bodies with Vegas Gold, and the wings with Gold Digger.


Now, I was ready for the Colorations Sprays!


I started spraying with Siesta Key ...


... and went crazy from there, adding Patience, Glorious, Rustic, and Plush.


On our make 'n take, we used the Stone Effects Dimensional Medium in Lava to stencil a word.  I wanted to use Wendy's Classic Words stencil.  It was a little watery then I remembered, but I did it anyway (just noticed SHAKE WELL on the bottle now while looking for the color name, duh!).  Messed up a little, but I can live with it.


At the time, I thought it was because the stencil was too small, so I used the Art Anthology Soliloquy stencil I bought when I purchased the paints at the Techniques Junkies booth.


This came out much better, and I was happy, but I decided to use my black Wendy Vecchi Embossing Paste on the last card.


It looked a little lost, so I added 3 more words, with a little drying time in between each so as not to smudge.


Cool.  Now, a little Brushed Corduroy Distress Ink around the edges ... 


... and cardstock bases using Stampin' Up! Elegant Eggplant on two, and Early Espresso for one.


I really enjoyed playing with these new paints.  I may just head over to the Techniques Junkies website now to order some more!

Thanks for visiting!